 v0_5 利用代码生成自动注入 Trace 函数
# v0.5 利用代码生成自动注入 Trace 函数
实现向目标代码中的函数 / 方法自动注入 Trace 函数。
**解决方案:**首先将 Trace 函数相关的代码打包到一个 module 中以方便其他 module 导入,然后增加一个命令行工具,可以以一个 Go 源文件为单位,自动向这个 Go 源文件中的所有函数注入 Trace 函数。
将 Trace 函数放入一个独立的 module 中
创建一个名为 instrument_trace 的目录,进入这个目录后,通过 go mod init 命令创建一个名为 github.com/bigwhite/instrument_trace 的 module:
$mkdir instrument_trace
$cd instrument_trace
$go mod init github.com/bigwhite/instrument_trace
go: creating new go.mod: module github.com/bigwhite/instrument_trace
2
3
4
将最新版的 trace.go 放入到该目录下,将包名改为 trace,并仅保留 Trace 函数、Trace 使用的函数以及包级变量,其他函数一律删除掉。这样,一个独立的 trace 包就提取完毕了。
作为 trace 包的作者,有义务告诉大家如何使用 trace 包。在 Go 中,通常会用一个 example_test.go 文件来编写使用 trace 包的演示代码,下面就是为 trace 包提供的 example_test.go 文件:
// instrument_trace/example_test.go
package trace_test

import (
    trace "github.com/bigwhite/instrument_trace"
)

func a() {
    defer trace.Trace()()
    b()
}

func b() {
    defer trace.Trace()()
    c()
}

func c() {
    defer trace.Trace()()
    d()
}

func d() {
    defer trace.Trace()()
}

func ExampleTrace() {
    a()
    // Output:
    // g[00001]:    ->github.com/bigwhite/instrument_trace_test.a
    // g[00001]:        ->github.com/bigwhite/instrument_trace_test.b
    // g[00001]:            ->github.com/bigwhite/instrument_trace_test.c
    // g[00001]:                ->github.com/bigwhite/instrument_trace_test.d
    // g[00001]:                <-github.com/bigwhite/instrument_trace_test.d
    // g[00001]:            <-github.com/bigwhite/instrument_trace_test.c
    // g[00001]:        <-github.com/bigwhite/instrument_trace_test.b
    // g[00001]:    <-github.com/bigwhite/instrument_trace_test.a
}
2
3
4
5
6
7
8
9
10
11
12
13
14
15
16
17
18
19
20
21
22
23
24
25
26
27
28
29
30
31
32
33
34
35
36
37
38
在 example_test.go 文件中,用 ExampleXXX 形式的函数表示一个示例,go test 命令会扫描 example_test.go 中的以 Example 为前缀的函数并执行这些函数。
每个 ExampleXXX 函数需要包含预期的输出,就像上面 ExampleTrace 函数尾部那样,在一大段注释中提供这个函数执行后的预期输出,预期输出的内容从// Output:的下一行开始。go test 会将 ExampleTrace 的输出与预期输出对比,如果不一致,会报测试错误。从这一点可以看出 example_test.go 也是 trace 包单元测试的一部分。
自动注入 Trace 函数
在 instrument_trace module 下面增加一个命令行工具,这个工具可以以一个 Go 源文件为单位,自动向这个 Go 源文件中的所有函数注入 Trace 函数。
根据带有可执行文件的 Go 项目布局,在 instrument_trace module 中增加 cmd/instrument 目录,这个工具的 main 包就放在这个目录下,而真正实现自动注入 Trace 函数的代码放在 instrumenter 目录下。
变化后的 instrument_trace module 的目录结构:
$tree ./instrument_trace -F
./instrument_trace
├── Makefile
├── cmd/
│   └── instrument/
│       └── main.go  # instrument命令行工具的main包
├── example_test.go
├── go.mod
├── go.sum
├── instrumenter/    # 自动注入逻辑的相关结构
│   ├── ast/
│   │   └── ast.go
│   └── instrumenter.go
└── trace.go
2
3
4
5
6
7
8
9
10
11
12
13
14
cmd/instrument/main.go 源码:
//  instrument_trace/cmd/instrument/main.go

... ...

var (
    wrote bool
)

func init() {
    flag.BoolVar(&wrote, "w", false, "write result to (source) file instead of stdout")
}

func usage() {
    fmt.Println("instrument [-w] xxx.go")
    flag.PrintDefaults()
}

func main() {
    fmt.Println(os.Args)
    flag.Usage = usage
    flag.Parse() // 解析命令行参数

    if len(os.Args) < 2 { // 对命令行参数个数进行校验
        usage()
        return
    }

    var file string
    if len(os.Args) == 3 {
        file = os.Args[2]
    }

    if len(os.Args) == 2 {
        file = os.Args[1]
    }
    if filepath.Ext(file) != ".go" { // 对源文件扩展名进行校验
        usage()
        return
    }

    var ins instrumenter.Instrumenter // 声明instrumenter.Instrumenter接口类型变量

    // 创建以ast方式实现Instrumenter接口的ast.instrumenter实例
    ins = ast.New("github.com/bigwhite/instrument_trace", "trace", "Trace")
    newSrc, err := ins.Instrument(file) // 向Go源文件所有函数注入Trace函数
    if err != nil {
        panic(err)
    }

    if newSrc == nil {
        // add nothing to the source file. no change
        fmt.Printf("no trace added for %s\n", file)
        return
    }

    if !wrote {
        fmt.Println(string(newSrc))  // 将生成的新代码内容输出到stdout上
        return
    }

    // 将生成的新代码内容写回原Go源文件
    if err = ioutil.WriteFile(file, newSrc, 0666); err != nil {
        fmt.Printf("write %s error: %v\n", file, err)
        return
    }
    fmt.Printf("instrument trace for %s ok\n", file)
}
2
3
4
5
6
7
8
9
10
11
12
13
14
15
16
17
18
19
20
21
22
23
24
25
26
27
28
29
30
31
32
33
34
35
36
37
38
39
40
41
42
43
44
45
46
47
48
49
50
51
52
53
54
55
56
57
58
59
60
61
62
63
64
65
66
67
作为命令行工具,instrument 使用标准库的 flag 包实现对命令行参数(这里是 -w)的解析,通过 os.Args 获取待注入的 Go 源文件路径。在完成对命令行参数个数与值的校验后,instrument 程序声明了一个 instrumenter.Instrumenter 接口类型变量 ins,然后创建了一个实现了 Instrumenter 接口类型的 ast.instrumenter 类型的实例,并赋值给变量 ins。
instrumenter.Instrumenter 接口类型的声明放在了 instrumenter/instrumenter.go 中:
type Instrumenter interface {
    Instrument(string) ([]byte, error)
}
2
3
这个接口类型的方法列表中只有一个方法 Instrument,这个方法接受一个 Go 源文件路径,返回注入了 Trace 函数的新源文件内容以及一个 error 类型值,作为错误状态标识。
之所以要抽象出一个接口类型,考虑的就是注入 Trace 函数的实现方法不一,为后续的扩展做好预留。
在这个例子中,默认提供了一种自动注入 Trace 函数的实现,那就是 ast.instrumenter,它注入 Trace 的实现原理是这样的:
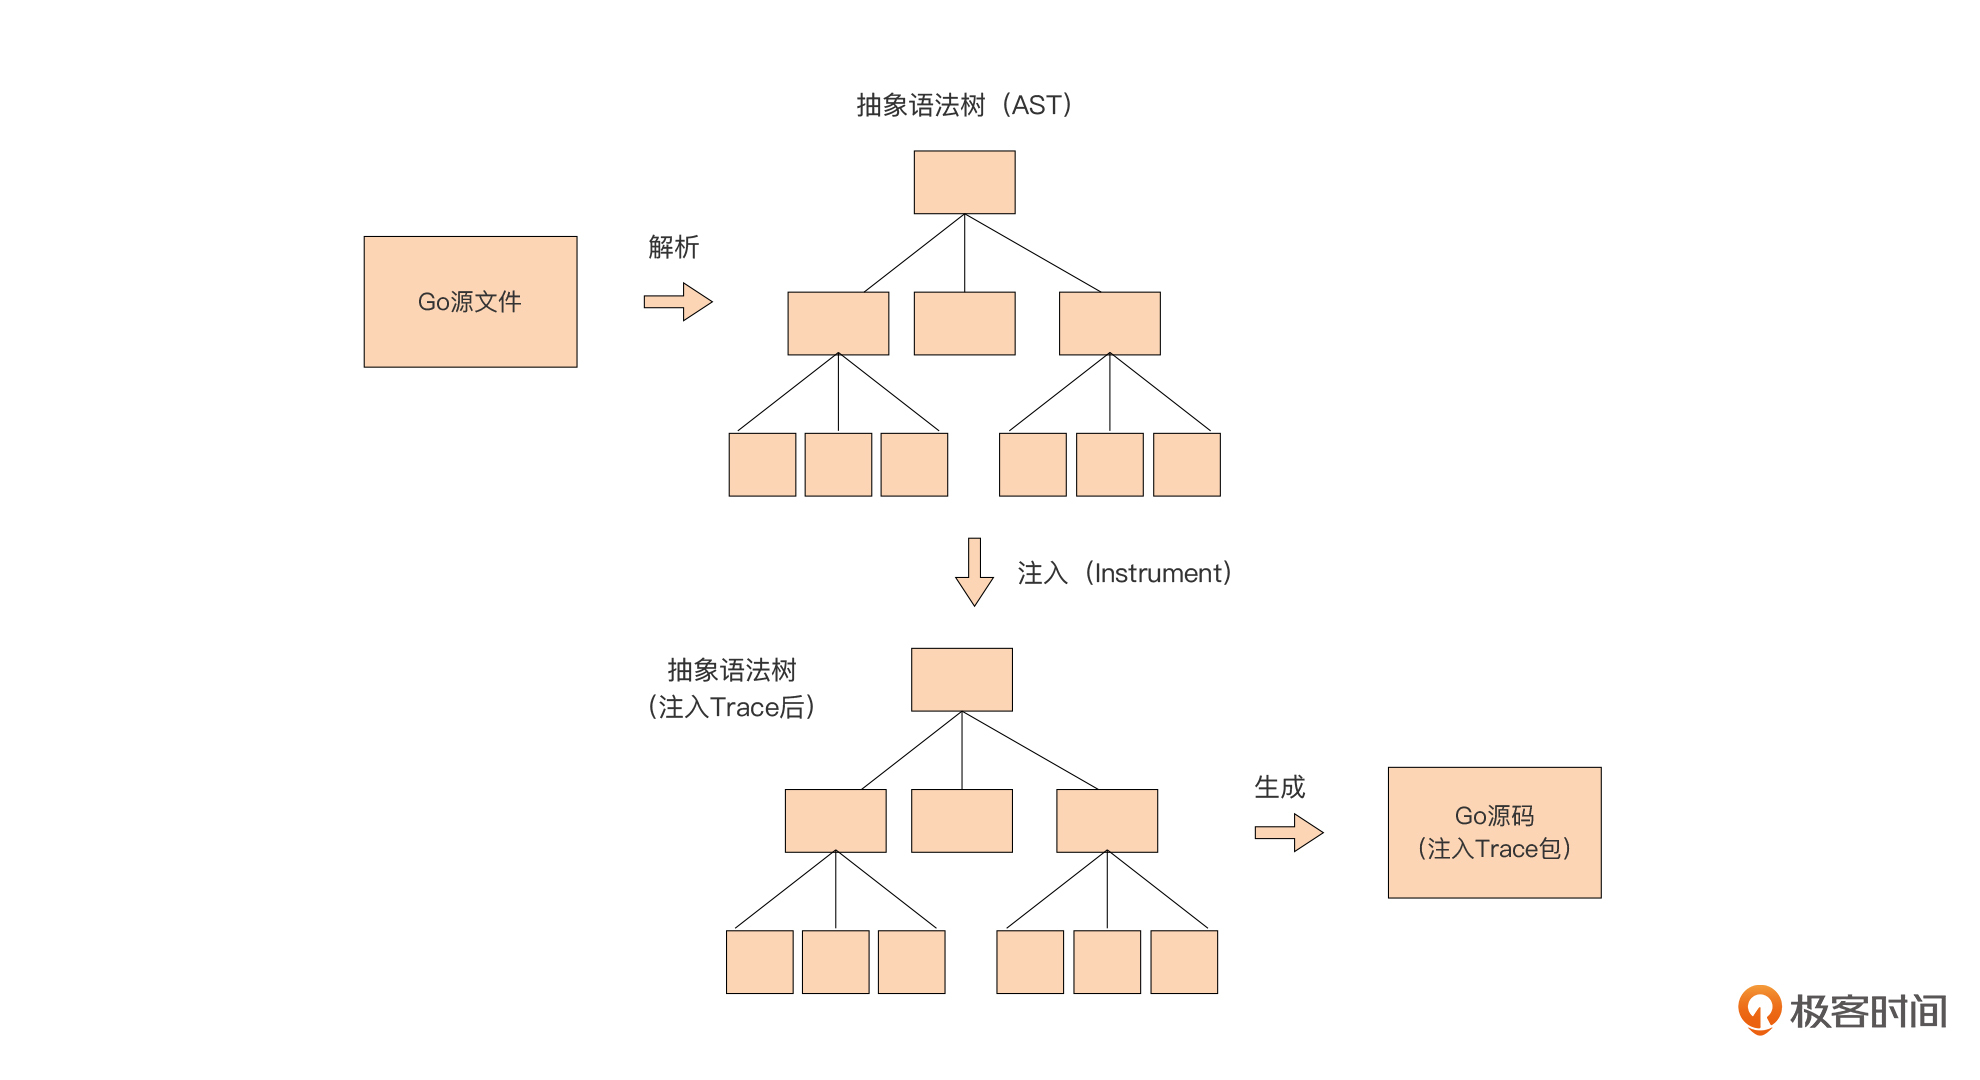
在这一实现方案中,先将传入的 Go 源码转换为抽象语法树。
抽象语法树(abstract syntax tree,AST):在计算机科学中,抽象语法树(abstract syntax tree,AST)是源代码的抽象语法结构的树状表现形式,树上的每个节点都表示源代码中的一种结构。因为 Go 语言是开源编程语言,所以它的抽象语法树的操作包也和语言一起开放给了 Go 开发人员,我们可以基于 Go 标准库以及Go 实验工具库提供的 ast 相关包,快速地构建基于 AST 的应用,这里的 ast.instrumenter 就是一个应用 AST 的典型例子。
一旦通过 ast 相关包解析 Go 源码得到相应的抽象语法树后,便可以操作这棵语法树,并按我们的逻辑在语法树中注入我们的 Trace 函数,最后我们再将修改后的抽象语法树转换为 Go 源码,就完成了整个自动注入的工作了。
ast.instrumenter 的 Instructment 方法的代码:
// instrument_trace/instrumenter/ast/ast.go

func (a instrumenter) Instrument(filename string) ([]byte, error) {
    fset := token.NewFileSet()
    curAST, err := parser.ParseFile(fset, filename, nil, parser.ParseComments) // 解析Go源码,得到AST
    if err != nil {
        return nil, fmt.Errorf("error parsing %s: %w", filename, err)
    }

    if !hasFuncDecl(curAST) { // 如果整个源码都不包含函数声明,则无需注入操作,直接返回。
        return nil, nil
    }

    // 在AST上添加包导入语句
    astutil.AddImport(fset, curAST, a.traceImport)

    // 向AST上的所有函数注入Trace函数
    a.addDeferTraceIntoFuncDecls(curAST)

    buf := &bytes.Buffer{}
    err = format.Node(buf, fset, curAST) // 将修改后的AST转换回Go源码
    if err != nil {
        return nil, fmt.Errorf("error formatting new code: %w", err)
    }
    return buf.Bytes(), nil // 返回转换后的Go源码
}
2
3
4
5
6
7
8
9
10
11
12
13
14
15
16
17
18
19
20
21
22
23
24
25
26
通过代码看到, Instrument 方法的基本步骤与上面原理图大同小异。Instrument 首先通过 go/paser 的 ParserFile 函数对传入的 Go 源文件中的源码进行解析,并得到对应的抽象语法树 AST,然后向 AST 中导入 Trace 函数所在的包,并向这个 AST 的所有函数声明注入 Trace 函数调用。
实际的注入操作发生在 instrumenter 的 addDeferTraceIntoFuncDecls 方法中:
// instrument_trace/instrumenter/ast/ast.go

func (a instrumenter) addDeferTraceIntoFuncDecls(f *ast.File) {
    for _, decl := range f.Decls { // 遍历所有声明语句
        fd, ok := decl.(*ast.FuncDecl) // 类型断言:是否为函数声明
        if ok {
            // 如果是函数声明,则注入跟踪设施
            a.addDeferStmt(fd)
        }
    }
}
2
3
4
5
6
7
8
9
10
11
遍历语法树上所有声明语句,如果是函数声明,就调用 instrumenter 的 addDeferStmt 方法进行注入,如果不是,就直接返回。
addDeferStmt 方法的实现如下:
// instrument_trace/instrumenter/ast/ast.go

func (a instrumenter) addDeferStmt(fd *ast.FuncDecl) (added bool) {
    stmts := fd.Body.List

    // 判断"defer trace.Trace()()"语句是否已经存在
    for _, stmt := range stmts {
        ds, ok := stmt.(*ast.DeferStmt)
        if !ok {
            // 如果不是defer语句,则继续for循环
            continue
        }

        // 如果是defer语句,则要进一步判断是否是defer trace.Trace()()
        ce, ok := ds.Call.Fun.(*ast.CallExpr)
        if !ok {
            continue
        }

        se, ok := ce.Fun.(*ast.SelectorExpr)
        if !ok {
            continue
        }

        x, ok := se.X.(*ast.Ident)
        if !ok {
            continue
        }
        if (x.Name == a.tracePkg) && (se.Sel.Name == a.traceFunc) {
            // defer trace.Trace()()已存在,返回
            return false
        }
    }

    // 没有找到"defer trace.Trace()()",注入一个新的跟踪语句
    // 在AST上构造一个defer trace.Trace()()
    ds := &ast.DeferStmt{
        Call: &ast.CallExpr{
            Fun: &ast.CallExpr{
                Fun: &ast.SelectorExpr{
                    X: &ast.Ident{
                        Name: a.tracePkg,
                    },
                    Sel: &ast.Ident{
                        Name: a.traceFunc,
                    },
                },
            },
        },
    }

    newList := make([]ast.Stmt, len(stmts)+1)
    copy(newList[1:], stmts)
    newList[0] = ds // 注入新构造的defer语句
    fd.Body.List = newList
    return true
}
2
3
4
5
6
7
8
9
10
11
12
13
14
15
16
17
18
19
20
21
22
23
24
25
26
27
28
29
30
31
32
33
34
35
36
37
38
39
40
41
42
43
44
45
46
47
48
49
50
51
52
53
54
55
56
57
虽然 addDeferStmt 函数体略长,但逻辑也很清晰,就是先判断函数是否已经注入了 Trace,如果有,则略过;如果没有,就构造一个 Trace 语句节点,并将它插入到 AST 中。
Instrument 的最后一步就是将注入 Trace 后的 AST 重新转换为 Go 代码,这就是期望得到的带有 Trace 特性的 Go 代码了。
利用 instrument 工具注入跟踪代码
在 instrument_trace 项目的 examples 目录下建立了一个名为 demo 的项目,使用 instrument 工具为 demo 项目下的 demo.go 文件自动注入跟踪设施。
demo.go 文件内容:
// instrument_trace/examples/demo/demo.go

package main

func foo() {
    bar()
}

func bar() {
}

func main() {
    foo()
}
2
3
4
5
6
7
8
9
10
11
12
13
14
首先构建 instrument_trace 下的 instrument 工具:
$cd instrument_trace
$go build github.com/bigwhite/instrument_trace/cmd/instrument
$instrument version
[instrument version]
instrument [-w] xxx.go
  -w  write result to (source) file instead of stdout
2
3
4
5
6
接下来使用 instrument 工具向 examples/demo/demo.go 源文件中的函数自动注入跟踪设施:
$instrument -w  examples/demo/demo.go
[instrument -w examples/demo/demo.go]
instrument trace for examples/demo/demo.go ok
2
3
注入后的 demo.go 文件:
// instrument_trace/examples/demo/demo.go

package main

import "github.com/bigwhite/instrument_trace"

func foo() {
    defer trace.Trace()()
    bar()
}

func bar() {
    defer trace.Trace()()
}

func main() {
    defer trace.Trace()()
    foo()
}
2
3
4
5
6
7
8
9
10
11
12
13
14
15
16
17
18
19
此时,如果再对已注入 Trace 函数的 demo.go 执行一次 instrument 命令,由于 instrument 会判断 demo.go 各个函数已经注入了 Trace,demo.go 的内容将保持不变。
由于 github.com/bigwhite/instrument_trace 并没有真正上传到 github.com 上,所以如果要运行 demo.go,可以为它配置一个下面这样的 go.mod:
// instrument_trace/examples/demo/go.mod

module demo

go 1.17

require github.com/bigwhite/instrument_trace v1.0.0

replace github.com/bigwhite/instrument_trace v1.0.0 => ../../
2
3
4
5
6
7
8
9
运行 demo.go 就不会遇到障碍了:
$go run demo.go
g[00001]:    ->main.main
g[00001]:        ->main.foo
g[00001]:            ->main.bar
g[00001]:            <-main.bar
g[00001]:        <-main.foo
g[00001]:    <-main.main
2
3
4
5
6
7